

by recreahq
Now that you have your domain name and server set up, the next step is getting your corporate e-mail addresses up and ready to work. This is not a complicated process, but there are a few things you need to know so you can choose what is best for you.
There are two kinds of e-mail addresses. First you have regular e-mail accounts you should be already familiar with; and next there are special e-mail accounts which are used just to automatically resend your e-mail to another e-mail address. This second type of e-mails is called e-mail alias or e-mail forwarder.
In addition, you can configure one e-mail address on your server to become a “catch all” e-mail account. This is to say that it will receive any e-mail message that was sent to an address which does not exist on your server, like, for example, ifno@example.com (meant to be info@example.com). Certainly, it might be useful if you do not want to miss any message sent to your domain, but it can also be food for spammers. You decide.
Before you create your corporate e-mails
Before we start, you need to ask yourself how you want to manage your e-mails in the future. There are two options: you either use an e-mail application like Microsoft Outlook, Mail for Mac, Thunderbird, Claws Mail, Sylpheed, Kmail or Evolution to download, process and send your e-mail messages; or you use a web-based solution like Gmail, Yahoo! Mail or Hotmail to do so.
If you decide to use an e-mail client, then you should go for a regular e-mail account. If you decide you will use a web-based solution, then an e-mail forwarder is better for you.
Creating your e-mail accounts
In both cases, the first step is to login to your control panel with your user name and password. Once you are in, locate the configuration area for e-mail accounts.
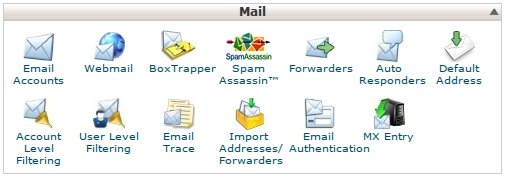
In cPanel, it looks like this:
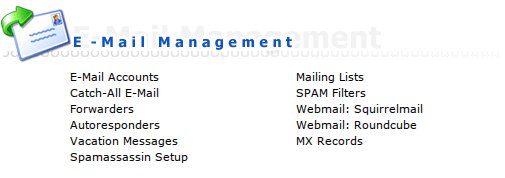
In DirectAdmin it looks like this:
Once you are there, click on either e-mail accounts or forwarders to create your e-mail addresses.
If you are creating a forwarder, then create the e-mail address and then indicate the system to which addresses the e-mails received by that account must be forwarded. It is an easy two-step process, so go ahead and try it. There is no password involved.
If you are creating a standard e-mail account, then click on e-mail accounts and follow the instructions you see on the screen…
– Create a user name (the @domain.com part is already there to prevent misspellings)
– Create a password
– Repeat your password to confirm
…and that’s it! Your e-mail address is created and ready to use… You just need to configure how you are going to read it.
Configuring your web-based e-mail for forwarder accounts
If you are going to use Gmail, Hotmail or Yahoo! Mail to process your messages, there is a two-step process to take care of. The first one is to tell these services you want to send your corporate e-mail from your account:
In Hotmail, click on the Settings icon (the gear icon in the top right corner) and then click on “Your e-mail accounts” and on “Add a send-only account”. Add your corporate e-mail address there and then, in Advanced Settings, check “Send email using Outlook.com’s server”. Hotmail will send an e-mail to your newly created e-mail address with a link you need to confirm, but don’t worry. That e-mail address redirects to your own Hotmail account, so you will receive it there. Click, confirm and you are ready to go.
In Gmail, click on the gear icon and then click on “Settings”. Once there, look for the “Accounts” tab and next on the “Add another email address you own” link. A pop up window will appear asking you for the e-mail address. Uncheck the “Treat as an e-mail alias” box, and in the next step, keep the “Send through Gmail” option active. Send the confirmation e-mail and wait for it in your own account. Why there? Because all e-mails to your corporate e-mail address are being redirected to your Gmail account. Piece of cake!
In Yahoo! Mail, click on the gear icon again, then to “Settings” and then to “Accounts”. There, find the line which reads “Send and receive email from other email services” and click on the “Add” button next to it. Add your account and a description, and submit. Like with the other two services above, wait for the confirmation e-mail and verify. Once you are done, you are ready to check all your e-mails in your Yahoo! Mail account!
Configuring your e-mail client to check your e-mail
There are currently two methods to configure your e-mail account in the email application. One is called POP (Post-Office Protocol) and what it will do is it downloads a full copy of your messages to your computer. The other one is called IMAP (Internet Message Access Protocol) and will help you connect to your e-mail account “on the go”, only downloading what you are willing to see.
The POP protocol has an advantage and a disadvantage. The advantage is that you will not wait to read, process and reply to your messages. The disadvantage is that if you delete message from your e-mail server, then your local copy will be your last copy of the message you are reading, so keeping backups is necessary.
The IMAP protocol also has advantages and disadvantages. The advantages are that you will be able to access your e-mail on more than one device, and that you will not need to download all your e-mails to check just one message. When using IMAP, your computer will download the messages you ask it to download “on the go”. The disadvantages are that you will need to wait for the computer to download a message you open all the time, and that, as you are not erasing messages from the server, your e-mail account quota may fill up, making your e-mail address unavailable to receive new messages until you erase the old messages to make space for the new ones.
Our advice? Choose wisely.
How to configure your e-mail client? OK, here we go:
The first step is to open your e-mail application and go to the account configuration option. It is usually found under the “Tools” menu.
Next, you should see a screen where you will include your name (which is the name others will see as sender when you send them an e-mail), e-mail address and password fields. Most applications will give you the option to whether store the password or not. Choose what you think is best for you.
Next comes the server configuration screen, and this is the one you may find a little tricky. You will see two concepts: e-mail server (POP or IMAP) and SMTP server (Simple Mail Transfer Protocol). The former are to receive your e-mails and the latter is for sending your e-mails. You will also see a concept which might be new for you, ports. Don’t get scared by these configuration settings, however. Port numbers are like doors in a wall. E-mail does not travel through the Internet using the same door like, say, your favourite video website. They use different doors, known as ports.
Now that you know which are all the details you need to know, let’s go for it. You should have all the information you need already. Just copy what you got from your server control panel when you created your accounts. If it gets complicated, remember you can always count on the professional assistance of InTechCenter to make your e-mail addresses work as they should.
In our next article we will give you tips on how to use your e-mail best. Don’t miss it!